البرنامج التعليمي لوحدة تحكم المشغل من أعلى إلى أسفل للوحدة
يعرف العديد من الأشخاص أنواع الألعاب مثل FPS (First-Person Shooter) وRTS (إستراتيجية الوقت الحقيقي)، ولكن هناك أيضًا العديد من الألعاب التي لا تندرج ضمن فئة واحدة محددة فقط. إحدى هذه الألعاب هي لعبة Top-Down Shooter.
Top-Down Shooter هي لعبة يتم فيها التحكم في اللاعب من منظور العرض العلوي.
من أمثلة ألعاب إطلاق النار من أعلى إلى أسفل Hotline Miami، وHotline Miami 2، وOriginal Grand Theft Auto، وما إلى ذلك.

لإنشاء وحدة تحكم الأحرف من أعلى إلى أسفل في Unity، اتبع الخطوات أدناه.
الخطوة 1: إنشاء البرامج النصية
في هذا البرنامج التعليمي، سنحتاج إلى برنامج نصي واحد فقط.
- قم بإنشاء سكريبت جديد، وقم بتسميته SC_TopDownController، وأزل كل شيء منه، والصق الكود أدناه بداخله:
SC_TopDownController.cs
using UnityEngine;

[RequireComponent(typeof(Rigidbody))]
[RequireComponent(typeof(CapsuleCollider))]

public class SC_TopDownController : MonoBehaviour
{
    //Player Camera variables
    public enum CameraDirection { x, z }
    public CameraDirection cameraDirection = CameraDirection.x;
    public float cameraHeight = 20f;
    public float cameraDistance = 7f;
    public Camera playerCamera;
    public GameObject targetIndicatorPrefab;
    //Player Controller variables
    public float speed = 5.0f;
    public float gravity = 14.0f;
    public float maxVelocityChange = 10.0f;
    public bool canJump = true;
    public float jumpHeight = 2.0f;
    //Private variables
    bool grounded = false;
    Rigidbody r;
    GameObject targetObject;
    //Mouse cursor Camera offset effect
    Vector2 playerPosOnScreen;
    Vector2 cursorPosition;
    Vector2 offsetVector;
    //Plane that represents imaginary floor that will be used to calculate Aim target position
    Plane surfacePlane = new Plane();

    void Awake()
    {
        r = GetComponent<Rigidbody>();
        r.freezeRotation = true;
        r.useGravity = false;

        //Instantiate aim target prefab
        if (targetIndicatorPrefab)
        {
            targetObject = Instantiate(targetIndicatorPrefab, Vector3.zero, Quaternion.identity) as GameObject;
        }

        //Hide the cursor
        Cursor.visible = false;
    }

    void FixedUpdate()
    {
        //Setup camera offset
        Vector3 cameraOffset = Vector3.zero;
        if (cameraDirection == CameraDirection.x)
        {
            cameraOffset = new Vector3(cameraDistance, cameraHeight, 0);
        }
        else if (cameraDirection == CameraDirection.z)
        {
            cameraOffset = new Vector3(0, cameraHeight, cameraDistance);
        }

        if (grounded)
        {
            Vector3 targetVelocity = Vector3.zero;
            // Calculate how fast we should be moving
            if (cameraDirection == CameraDirection.x)
            {
                targetVelocity = new Vector3(Input.GetAxis("Vertical") * (cameraDistance >= 0 ? -1 : 1), 0, Input.GetAxis("Horizontal") * (cameraDistance >= 0 ? 1 : -1));
            }
            else if (cameraDirection == CameraDirection.z)
            {
                targetVelocity = new Vector3(Input.GetAxis("Horizontal") * (cameraDistance >= 0 ? -1 : 1), 0, Input.GetAxis("Vertical") * (cameraDistance >= 0 ? -1 : 1));
            }
            targetVelocity *= speed;

            // Apply a force that attempts to reach our target velocity
            Vector3 velocity = r.velocity;
            Vector3 velocityChange = (targetVelocity - velocity);
            velocityChange.x = Mathf.Clamp(velocityChange.x, -maxVelocityChange, maxVelocityChange);
            velocityChange.z = Mathf.Clamp(velocityChange.z, -maxVelocityChange, maxVelocityChange);
            velocityChange.y = 0;
            r.AddForce(velocityChange, ForceMode.VelocityChange);

            // Jump
            if (canJump && Input.GetButton("Jump"))
            {
                r.velocity = new Vector3(velocity.x, CalculateJumpVerticalSpeed(), velocity.z);
            }
        }

        // We apply gravity manually for more tuning control
        r.AddForce(new Vector3(0, -gravity * r.mass, 0));

        grounded = false;

        //Mouse cursor offset effect
        playerPosOnScreen = playerCamera.WorldToViewportPoint(transform.position);
        cursorPosition = playerCamera.ScreenToViewportPoint(Input.mousePosition);
        offsetVector = cursorPosition - playerPosOnScreen;

        //Camera follow
        playerCamera.transform.position = Vector3.Lerp(playerCamera.transform.position, transform.position + cameraOffset, Time.deltaTime * 7.4f);
        playerCamera.transform.LookAt(transform.position + new Vector3(-offsetVector.y * 2, 0, offsetVector.x * 2));

        //Aim target position and rotation
        targetObject.transform.position = GetAimTargetPos();
        targetObject.transform.LookAt(new Vector3(transform.position.x, targetObject.transform.position.y, transform.position.z));

        //Player rotation
        transform.LookAt(new Vector3(targetObject.transform.position.x, transform.position.y, targetObject.transform.position.z));
    }

    Vector3 GetAimTargetPos()
    {
        //Update surface plane
        surfacePlane.SetNormalAndPosition(Vector3.up, transform.position);

        //Create a ray from the Mouse click position
        Ray ray = playerCamera.ScreenPointToRay(Input.mousePosition);

        //Initialise the enter variable
        float enter = 0.0f;

        if (surfacePlane.Raycast(ray, out enter))
        {
            //Get the point that is clicked
            Vector3 hitPoint = ray.GetPoint(enter);

            //Move your cube GameObject to the point where you clicked
            return hitPoint;
        }

        //No raycast hit, hide the aim target by moving it far away
        return new Vector3(-5000, -5000, -5000);
    }

    void OnCollisionStay()
    {
        grounded = true;
    }

    float CalculateJumpVerticalSpeed()
    {
        // From the jump height and gravity we deduce the upwards speed
        // for the character to reach at the apex.
        return Mathf.Sqrt(2 * jumpHeight * gravity);
    }
}![]()
الخطوة 2: إنشاء التظليل
يتطلب هذا البرنامج التعليمي أيضًا تظليلًا مخصصًا، وهو أمر ضروري لجعل هدف الهدف يتراكب مع بقية الكائنات (في الأعلى دائمًا).
- انقر بزر الماوس الأيمن على عرض المشروع -> إنشاء -> تظليل -> تظليل السطح القياسي
- اسم التظليل "Cursor"

- افتح التظليل وأزل كل ما بداخله ثم الصق الكود أدناه:
المؤشر.تظليل
Shader "Custom/FX/Cursor" {
	Properties {
		_MainTex ("Base", 2D) = "white" {}
	}

	CGINCLUDE

		#include "UnityCG.cginc"

		sampler2D _MainTex;

		half4 _MainTex_ST;

		struct v2f {
			half4 pos : SV_POSITION;
			half2 uv : TEXCOORD0;
		};

		v2f vert(appdata_full v) {
			v2f o;

			o.pos = UnityObjectToClipPos (v.vertex);
			o.uv.xy = TRANSFORM_TEX(v.texcoord, _MainTex);

			return o;
		}

		fixed4 frag( v2f i ) : COLOR {
			return tex2D (_MainTex, i.uv.xy);
		}

	ENDCG

	SubShader {
		Tags { "RenderType" = "Transparent" "Queue" = "Transparent+100"}
		Cull Off
		Lighting Off
		ZWrite Off
		ZTest Always
		Fog { Mode Off }
		Blend SrcAlpha OneMinusSrcAlpha

	Pass {

		CGPROGRAM

		#pragma vertex vert
		#pragma fragment frag
		#pragma fragmentoption ARB_precision_hint_fastest

		ENDCG

		}

	}
	FallBack Off
}![]()
الخطوة 3: إعداد وحدة التحكم بالأحرف من أعلى إلى أسفل
لنقم بإعداد وحدة تحكم الأحرف من أعلى إلى أسفل:
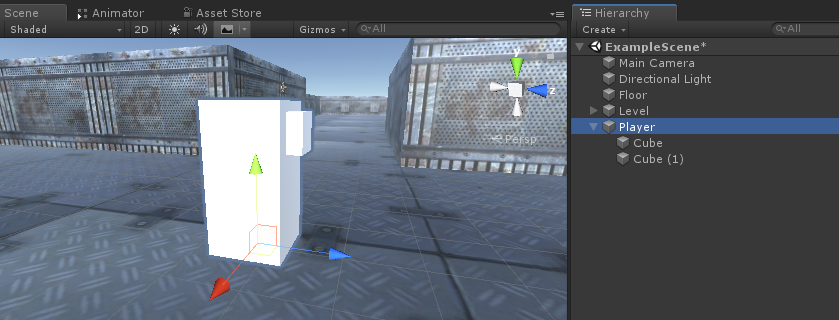
- قم بإنشاء GameObject جديد وقم بتسميته "Player"
- قم بإنشاء مكعب جديد وقم بقياسه (في حالتي يكون المقياس (1، 2، 1))
- أنشئ مكعبًا ثانيًا، وصغر حجمه كثيرًا، ثم انقله إلى منطقة عليا (وهذا ببساطة لمعرفة الاتجاه الذي ينظر إليه اللاعب)
- انقل كلا المكعبين داخل الكائن "Player" وقم بإزالة مكونات BoxCollider الخاصة بهما
الآن، قبل المضي قدمًا، لنقم بإنشاء الهدف الجاهز:
- قم بإنشاء GameObject جديد وقم بتسميته "AimTarget"
- قم بإنشاء رباعي جديد (GameObject -> 3D Object -> Quad) وحركه داخل الكائن "AimTarget"
- قم بتعيين الملمس أدناه إلى رباعي وقم بتغيير تظليل المواد إلى 'Custom/FX/Cursor'
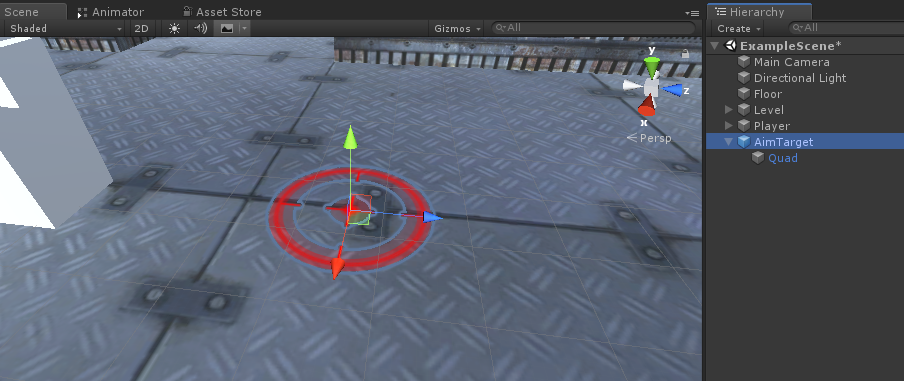
- احفظ "AimTarget" في المبنى الجاهز وقم بإزالته من المشهد
![]()
العودة إلى مثيل المشغل:
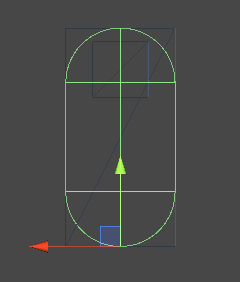
- قم بإرفاق البرنامج النصي SC_TopDownController بالكائن "Player" (ستلاحظ أنه أضاف بعض المكونات الإضافية مثل Rigidbody وCapsuleCollider)
- قم بقياس CapsuleCollider حتى يتطابق مع نموذج المشغل (في حالتي، يتم ضبط الارتفاع على 2 ويتم ضبط المركز على (0، 1، 0)
- وأخيرًا، قم بتعيين المتغيرات "Player Camera" و "Target Indicator Prefab" في SC_TopDownController
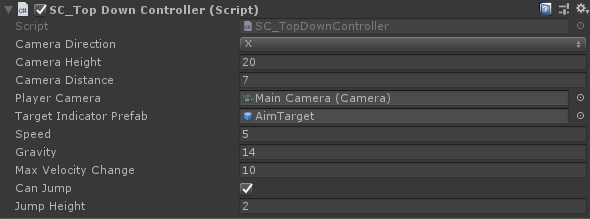
مثيل Player جاهز الآن، فلنختبره:
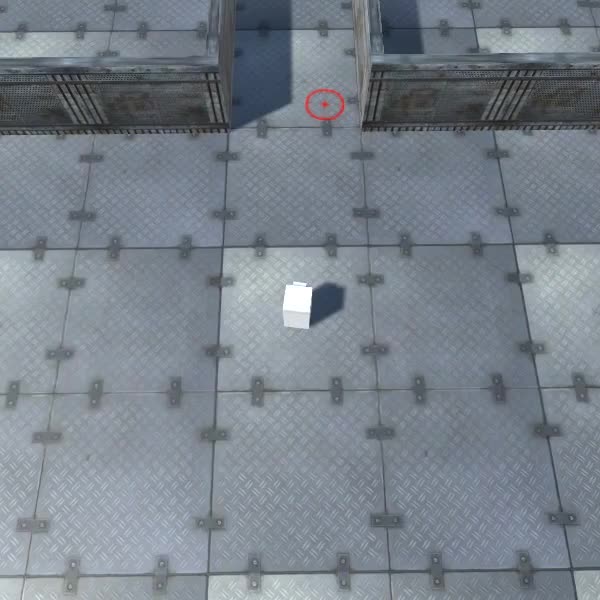
كل شيء يعمل كما هو متوقع.